Constructing wall space and foundations with the concrete block is a simpler and normally more affordable option than poured concrete or maybe a stone building, though the end result isn't extremely appealing. Stucco, a factory-prepared or custom-mixed cement plaster, offers a cheap, attractive, durable, and also low maintenance finish on the interior or maybe exterior foundation and garden wall space in any kind of weather.
Typically you are able to work with a time tested Portland cement plaster (one part Portland cement, one component lime, plus four parts good sand) for a base layer. While lime is not required, the working period of the stucco - a plus for the new worker is extended by it. For much more consistent batch-to-batch consistency as well as color, it is far better to select a factory prepared stucco for the next, finish coat.
Apply stucco in gentle (50 to 70 deg. F.) weather. The software is able to be as complex or simple as the abilities of yours and also expertise allow; as well as the textures which you can have are limited only by the creativity of yours. The standard methods are reported below. Local problems and attributes, along with particulars of the project of yours might involve exclusive mixes or perhaps additives. White sand and white cement, for instance, might be perfect selections for light-colored or white stucco. Bonding additives might be necessary for specific nonabsorptive surfaces. Your masonry dealer is better prepared to advise you about the proper blend to work with for the specific program of yours. For more info we recommend you get a copy of the Portland Cement Plaster (Stucco) Manual, released by the Portland Cement Association, and you reference the finish coat manufacturer's set up instructions.
Materials plus tools you need:
- Mortar mixer (rental merchandise is shown)
- Power washer (rental item)
- Hoe
- Wood lath and masonry nails
- Shovel
- Hammer
- Hawk (board with manage for loading cement)
- Worker's gloves
- Nozzle and garden hose
- Goggles
- Common mason's trowel
- Type I Portland cement
- Pointed mason's trowel
- Lime
- Long wood or even metal straightedge
- Clean good sand
- Timber float (wood block with handle)
- Sponge float
- Wheelbarrow
- Fingernail puller
Step one: Inspect simply Prepare the Surface
The block wall structure has to be true and sound, along with significant cracks or gaps must be fixed. The surface should also be devoid of soil, paint, efflorescence, mold, or maybe some other surface contaminants which may hinder bonding. Typically, power washing is actually that's necessary for more mature untreated walls, though in certain cases sandblasting is necessary.
Step two: Install Screed
Attach short-term strips of 3/8 in thick wood lath horizontally on the bottom and top (and, on a taller structure, the middle) of the structure, utilizing masonry nails. The straightedge (called a rod) which will be utilized to level the surface area in Step seven will be guided by these screeds.
Step three: Obtain Materials
A cubic foot of stucco is going to cover approximately seventeen square feet of the structure with the first layer. Expected coverage for factory prepared finish stucco is claimed on the label. You will want approximately one cubic foot of moist sand along with 1/4 to 1/3 container of cement and also the exact same volume of lime to create a cubic foot of plaster.
Step four: Dampen the Wall
Stucco is best put on over a moist wall, therefore mist (not soak) the area with a garden hose and also nozzle just before a program.
Caution: Cement, as well as lime, are caustic. Before you start mixing, protect the hands of yours with serious work gloves and the eyes of yours with goggles.
Step five: Mix the Basecoat Plaster
For big tasks, you will wish to lease a strength mortar mixer. First, pour approximately 2/3 of warm water and begin the mixer. In succession add about 50 % the sand, the lime, the cement, and also the balance of the sand. Blend for a couple of minutes, including the other water as must attain a uniform batch. In case you blend with a hoe in a wheelbarrow, blend the dry ingredients initially and add half warm water then and immediately pour the rest as-needed. Though dry formula may be calculated out in buckets, typically you count shovelsful as you load the wheelbarrow or perhaps mixer.
Tip: Weigh shovelsful of cement and lime separately so you are able to compute approximate water requirements for the mix of yours. Clean water, that is approximately 7.8 fat per gallon, really should equal around fifty percent the mass of the cementitious substance (lime and cement) in the blend. Test with some small batches first to identify the quantity of water needed. The mix must have the consistency of soft butter or maybe pudding. You are able to retemper the blend (add water whenever the blend has gotten very stiff) as much as thirty minutes after the original mixing.
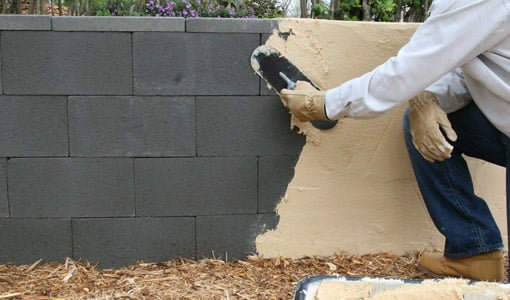
Step six: Apply the Base Coat
Load a little stucco holding a hawk after which onto your trowel. At first, keep the loaded trowel at a 45 degree perspective against the structure, then lower it gradually to thirty degrees as you use the stucco with a sweeping action. Apply enough pressure to make the stucco into the basic wall surface. On vertical surfaces, you will most likely think it is simplest to work from the bottom part up. The first layer must be approximately 3/8 in. thick over the whole region. Stay away from too much troweling, that could cause bonding problems. Load a little stucco on a hawk after which onto your trowel. At first, keep the loaded trowel at a 45 degree perspective against the structure, then lower it gradually to thirty degrees as you use the stucco with a sweeping action. Apply enough pressure to make the stucco into the basic wall surface. On vertical surfaces, you will most likely think it is simplest to work from the bottom part up. The first layer must be approximately 3/8 in. thick over the whole region. Stay away from too much troweling, that could cause bonding problems.
Step seven: Level the Plane
After only a couple of mins make use of a straightedge (wood or metal) to level the surface area to some uniform 3/8 in. thickness. Place the ends of the straightedge on timber or maybe metallic screeds (see level two) as well as, utilizing an up and down movement, gradually bring the straightedge across the wall to take out extra material. Fill some repeat plus depressions leveling.
Step eight: Remove Screeds
Get rid of the wood screeds with a toenail puller and hammer, annoying the stucco only a small amount as they can.
Step nine: Float the Surface
After the surface area sheen has disappeared but prior to the stucco has hardened excessive being worked, go over the entire surface with rubber or maybe foam mason's float in a swirling motion. This consolidates the stucco and minimizes the quantity of shrinkage and also cracking that happens as the first layer cures.
Step 10: Mix and Apply Finish Coat
Blend and use the finish layer the following day. This particular jacket is usually simply 1/8 to 1/4 inch thick so screeds aren't necessary. The treatment is usually like the above. There are variations from product to item, nonetheless, and so follow the manufacturer's directions.
Step eleven: Texture the Surface
Dozens of textures are attainable. Among the easiest is a relatively difficult but even surface attained by tooling the finish layer with a sponge float and brush. In several instances, an extra surface layer of surface substance is used over the original finish coat plus tooled with other tool or a trowel.
No comments:
Post a Comment